SPNote

SharePoint Notes

SharePoint 2010 Columns

안녕하세요?

Will입니다. 이번에는 저번에 2007에서 개발한 소스를 가지고 SharePoint 2010 에서 다시 사용 할 수 있는지

체크를 해보도록 하겠습니다.

VS2010 의 Class Library를 사용해서 만들어 보았습니다 밑에 포스팅 되어 있는 내용을 참고로 하시면은 됩니다.

그리고 나서 배포를 해보았습니다. 배포후 아래와 같은 결과 하면을 볼 수 있습니다.

결과 1) 새글 추가

 결과2) 내용을 채우 겠습니다.

결과 3) 내용을 쓰면은 0의 값이 들어 가는걸 확인 할 수 있을 것입니다. 

 결과 4) 그리고 나서 DisplayMode에서 확인한 결과 버튼이 잘나오네요.

 결과 5)버튼을 클릭 해 보았습니다.


결과 6) 그리고 닫으니.... 허걱 값이 안변하네요! 아마 중간에 확인을 눌렀을시 이벤트가 동작 해야 되는데 닫기를 눌럿더니 값이 안변한것 같습니다.

결과 7) 하지만 F5을 눌러 Refresh를 하니 아래와 같이 값이 들어가 있는 걸 확인 할 수 있습니다.  

SharePoint 2010은 ClientScript로 Ajax처리가 되어 있어서 값의 변화가 있을 시 제로드를 하기 때문에 기존의 값이 변하지 않는 것을 확인 할 수 있습니다.

하지만 자체 DB에 저장되어 있는 값은 +1이 되어 있는 것을 확인 할 수 있습니다.  해당 문제에 대해서는 조금 더 SharePoint 2010을 분석한 후에 추후에

수정 하도록 하겠습니다.  밑에 SharePoint 2010 개발 소스를 올립니다. 참고 하시고 소스에는 주석으로 저희 사이트 이름을 소스에 꼭 넣어서 사용해 주시기 바랍니다.

 질문은 메일로 보내주시거나 코멘트를 다시면은 답변을 드리도록 하겠습니다.


SPNote.SharePoint.Fields.zip (38.15 kb)

SharePoint 2010 Study 1

안녕하세요? Karl 입니다.

Finally!!! 개발 PC를 손에 넣었습니다. 그동안 눈팅만 하다가 저만의 규칙?에 따라 그냥 구매했습니다.
(규칙: 소비만큼 열씨미 하게 된다? CPU 는 중간에 바꾸기 어려우므로 좋은걸로 산다. 등등...)
Will 과 함께 2010년 1월 9일(토요일) AM 10:00 에 용산에서 만나서 집으로 옮기고 밤새 조립을...
그리고 현재의 Fantastic PC 를 감상하고 있답니다.

웁스~ Windows 2008 부터 시작하여 SharePoint 2010 까지 설치하는데 거의 하루가 걸렸습니다... ㅡㅡ;
더욱 맘에 안드는 것은 Search 서비스 시작하고 나서 메모리를 확 잡아 먹는다는 것입니다.
(메모리가 4GB 인데, 거의 잡아먹습니다. => 식충으로 예상하고 있음...)
Stop 시키고 싶지만, SP 2007 처럼 버튼 한방에 안되는 관계로 PASS~~ 했습니다. ㅠㅠ
흠... List(목록)의 Item 출력이 궁금해서 AllItems.aspx 렌더링된 html 을 Visual Studio 2010 으로 열었더니...
기어갑니다. TAB 누르면 잠시 있다가 움직이는 그런 비쥬얼 효과... , 승질나서 VS 2008 로 이사갔습니다. ㅡㅡ;

여담이 길었습니다만...
SP2010 개발을 위해서는 고사양의 시스템이 받쳐주지 않으면 일 못한다고 배째야할 것 같습니다.


그럼 SharePoint 2010 Study 을 시작하겠습니다. 주제는 예상하셨다시피... AllItems.aspx 입니다.

[AllItems.aspx]

[code:html;ln=off]

<!-- Item1 Begin -->
<tr class="ms-itmhover" iid="2,1,0">
    <td class="ms-vb-itmcbx ms-vb-firstCell">
        <input type="checkbox" class="s4-itm-cbx" />
    </td>
    <td class="ms-vb2"></td>
    <td height="100%" onmouseover="OnChildItem(this)" class="ms-vb-title">
        <div class="ms-vb itx" CTXName="ctx2" id="1" Field="LinkTitle" Perm="0x7fffffffffffffff" EventType="">
            <a onfocus="OnLink(this)"
                href="http://wss40/_layouts/listform.aspx?
                    PageType=4&amp;
                    ListId={A5E99EC8-9246-41C2-8539-483BCEC57E0A}&amp;
                    ID=1&amp;
                    ContentTypeID=0x010097742119E6460B479093DF8B310706DF"
                onclick="EditLink2(this,2);return false;" target="_self">
                Item1
            </a>
            <img src="/_layouts/1033/images/new.gif" alt="New" title="New" class="ms-newgif" />
        </div>
        <div class="s4-ctx">
            <span> </span>
            <a onfocus="OnChildItem(this.parentNode.parentNode); return false;"
                onclick="PopMenuFromChevron(event); return false;" href="javascript:;" title="Open Menu"></a>
            <span> </span>
        </div>
    </td>
    <!-- Body Column1 -->
    <td class="ms-vb2">
        <div dir="" class="ms-rtestate-field">
            <div class="ExternalClass0463C750337B4A10B3DC94F5CC2F35FF"><p>Body​</p></div>
        </div>
    </td>
</tr>
<!-- Item1 End -->

[/code]

현재 SP2007 이 없어서 비교할 수는 없지만, 기억을 더듬어 간략히 정리하겠습니다.
첫째로, 렌더링을 담당했던 schema.xml 에서 이제는 XSL 로 대체되는 것으로 보입니다.
schema.xml 라인수는 87 밖에 되지 않고 main.xsl 을 참조합니다.

<XslLinkDefault="TRUE">main.xsl</XslLink>

그리고 main.xsl 은 아래와 같이 필드타입, 뷰스타일 xsl 파일을 참조합니다.
<xsl:importhref="/_layouts/xsl/fldtypes.xsl"/>
<
xsl:importhref="/_layouts/xsl/vwstyles.xsl"/>

뒤져보시면, 위 XSL 파일에서 Item Rendering 부분이 보입니다.
SP2010 에서는 XSLT 가 지원된다고 하지만, 기존의 CAML 방식에서 XSLT 로 변환이라고 한다면
schema.xml 부분이 그 대상이라고 생각합니다.
둘다 복잡해보이긴 하지만, 상대적으로 표준적인 XSLT 방식을 채택한 것은 좋은 변화라고 생각합니다.
(참조: Microsoft Professional Evaluation Guide Part - 30 Page)


호기심으로 시작한 이번 글은 여기서 마치도록 하겠습니다.
다음 주제는 아래 중 하나가 될 것으로 예상합니다.
  1. VS2010 에 추가된 SharePoint Templates
  2. VS2010 에 추가된 기능 (SandBoxed solution, Server Explorer 에서 탐색기 형태로 사이트를 볼 수 있는 기능 등)
  3. Microsoft Professional Evaluation Guide Part 2

그럼 이만 줄이겠습니다.

[참조]
SP2010_Study1.zip (57.88 kb)

SharePoint Object Model

안녕하세요?

Will 입니다.

이번에는 SharePoint2010 OM에 대해서 내용을 적기로 하겠습니다.

우선 OM(Object Model) SharePoint2010에서는 사용자 단에서 즉 클라이언트 단에서 돌아 갈 수 있도록 dll로 정의가 되어 있는데요, Windows 응용프로그램, Consol 응용프로그램, Silverligth 응용프로그램 그리고 Javascript 에서 클라이언트 스크립팅으로 사용을 할 수 있습니다.


1 .Clinet Object Model

 우선 VS2010으로 Window응용프로그램을 만들도록 하겠습니다. 응용프로그램을 만드실 때 .net 3.5를 베이스로 해주시고 만드시면은 되겠습니다.

그리고 폼에 각각의 컨트롤들을 그림과 같이 배치 하시면은 되겠습니다.

컨트롤

ID

Event

Text Box

txtUrl


List Box

lstCollection


Button

btnSearch

btnSearch_Click


그런 다음 참조를 통해서 C:\Program Files\Common Files\Microsoft Shared\Web Server Extensions\14\ISAPI 해당 경로에 잇는 Microsoft.SharePoint.Client.dll Microsoft.SharePoint.Client.Runtime.dll 을 추가해 줍니다.


그런 다음 해당 소스를 자신의 코딩에 맞춰서 넣습니다.

using System;

using System.Collections.Generic;

using System.ComponentModel;

using System.Data;

using System.Drawing;

using System.Linq;

using System.Text;

using System.Windows.Forms;

using Microsoft.SharePoint.Client;   

namespace SPNote.SharePoint.ObjectModel{   

public partial class ClientOM : System.Windows.Forms.Form    {       

public ClientOM()        {            

InitializeComponent();       

}        

private void btnSearch_Click(object sender, EventArgs e)        {           

//Create A Client Connection           

using (ClientContext clientCon = new ClientContext(txtUrl.Text))           

{                //Get the Site Collection               

Site csite = clientCon.Site;                

//Fill SharePoint Data               

clientCon.Load(csite);               

 clientCon.ExecuteQuery();                

lstCollection.Items.Add(csite.Url);                

//Get the Site                

Web cWeb = clientCon.Web;                

//Fill SharePoint Data               

clientCon.Load(cWeb);               

clientCon.ExecuteQuery();                 

lstCollection.Items.Add(cWeb.Title);                

//Load Lists               

clientCon.Load(cWeb.Lists);               

clientCon.Load(cWeb, x => x.Lists.Where(l => l.Title != null));               

clientCon.ExecuteQuery();                 

foreach (List list in cWeb.Lists)               

{                   

lstCollection.Items.Add(list.Title);               

}           

}       

}   

}//class

}//namespace  

그리고 실행을 하면은 해당 값들을 확인 할 수 있습니다.


2. ECMAScript Client Object Model

 Script단에서 SharePoint 컨트롤을 사용 할 수 있도록 정의가 되어 있는 것이다. 우선 Project를 새로 생성 하는데 SharePoint 의 빈 SharePoint 프로젝트를 선택하고 생성 한 다음 Applicationpage를 추가 한다. 그럼 Layouts 밑에 해당 페이지가 생성 되게 된다.


그리고 나서 해당 소스를 집어 넣고 돌려 본다. 첫번째 했던 ClientOM과 비슷한 소스 이다. 보고 이해 하시기 바랍니다. 그럼 해당 컨트롤을 통해서 Ajax처리가 되어서 해당 사이트의 타이틀을 읽어 올 수 있습니다.

<%@ Assembly Name="$SharePoint.Project.AssemblyFullName$" %>

<%@ Import Namespace="Microsoft.SharePoint.ApplicationPages" %>

<%@ Register Tagprefix="SharePoint" Namespace="Microsoft.SharePoint.WebControls" Assembly="Microsoft.SharePoint, Version=14.0.0.0, Culture=neutral, PublicKeyToken=71e9bce111e9429c" %>

<%@ Register Tagprefix="Utilities" Namespace="Microsoft.SharePoint.Utilities" Assembly="Microsoft.SharePoint, Version=14.0.0.0, Culture=neutral, PublicKeyToken=71e9bce111e9429c" %><%@ Register Tagprefix="asp" Namespace="System.Web.UI" Assembly="System.Web.Extensions, Version=3.5.0.0, Culture=neutral, PublicKeyToken=31bf3856ad364e35" %><%@ Import Namespace="Microsoft.SharePoint" %><%@ Assembly Name="Microsoft.Web.CommandUI, Version=14.0.0.0, Culture=neutral, PublicKeyToken=71e9bce111e9429c" %>

<%@ Page Language="C#" AutoEventWireup="true" CodeBehind="ECMAScript.aspx.cs" Inherits="EcmascriptClientOM.Layouts.EcmascriptClientOM.ECMAScript" DynamicMasterPageFile="~masterurl/default.master" %> 

<asp:Content ID="PageHead" ContentPlaceHolderID="PlaceHolderAdditionalPageHead" runat="server">

<SharePoint:ScriptLink ID="SPScriptLink" runat="server" LoadAfterUI="true" Localizable="false" Name="sp.js" /> 

<script language="javascript" type="text/jscript" >   

function eClientOM(){       

var context = new SP.ClientContext.get_current();       

this.site = context.get_web();       

context.load(this.site);       

context.executeQueryAsync(Function.createDelegate(this,this.rSuceess),Function.createDelegate(this,this.rFailure));   

}    

function rSuceess(senger, args){       

alert("site title" + this.site.get_title());   

}       

function rFailure(sender, args){       

alert("Request failed " + args.get_message());   

}</script>

</asp:Content> 

<asp:Content ID="Main" ContentPlaceHolderID="PlaceHolderMain" runat="server">   

<input type="button" onclick="eClientOM()" value="Ecmas" />

</asp:Content> 

<asp:Content ID="PageTitle" ContentPlaceHolderID="PlaceHolderPageTitle" runat="server">Application Page</asp:Content> 

<asp:Content ID="PageTitleInTitleArea" ContentPlaceHolderID="PlaceHolderPageTitleInTitleArea" runat="server" >My Application Page</asp:Content>   


3. Silverlight Client Object Model

 해당 dll의 오류가 있어서 지금 작업은 하지 못하였으나 조만간 작업을 하여서 올리도록 하겠습니다.


좋은 한해 보내시고 질문 사항이 있으면은 메일을 주시거나 코멘트를 달아 주시면은 답변을 드리도록 하겠습니다.


SP.js (379.92 kb)

Microsoft Professional Evaluation Guide Part 1

Microsoft Professional Evaluation Guide Part 1
Ver 1.0
Jan 1st, 2010 

이 문서는 SharePoint 2010 에 대해 개발자로서의 개인적인 해석의 간략한 정리입니다. 2년간의 MOSS 2007 개발 경험을 바탕으로 문서를 작성했으나 개인이 작성한 문서이므로 너무 믿으면 후회할 수도 있습니다 

얼마 전 있었던 SharePoint 2010 Ignite Training for Partners 프로그램에 참가하지는 못했지만 이 문서의 정리를 위해 Microsoft Professional Evaluation Guide Part 를 선택했습니다.
원본 문서에서 참고한 모든 내용의 권리는 Microsoft 에 있습니다. 

비 영어권 Korean 으로서 웹에서 자료만 뒤지는 게 아쉽지만, 온라인 그리고 곧 출시될 서적 등의 리소스를 활용하면 이전 버전인 2007 에서 했던 것처럼 같이 많은 부분을 커버할 수 있을 것 같습니다. (인도 방갈로에서 곧 열린다고 합니다. 자신의 파워?를 이용하여 기회를 살리시기 바랍니다.) 

문서의 구성은 크게 2 단계 혹은 3 단계로 나누어 진행하려고 합니다.SP 2010 에 대한 내용과 개발 예제가 그것이지만 아직 개발 PC 의 구매가 이루어지지 않은 관계로 우선은 내용에 대한 생각이 주가 될 것으로 예상합니다  


문서 요약
Microsoft SharePoint 2010 의 기능 집합과 확장 가능한 부분에 개요이며 개발자가 위를 이용하여 포괄적인 솔루션을 생성할 수 있도록 이해를 주기 위한 문서입니다. 

소개
빠르게 솔루션을 개발할 수 있도록 풍부한 기능의 제공과 Visual Studio 2010 SharePoint Designer 2010 를 이용하여 생산성 향상과 Visual Studio Team Foundation Server Application lifecyle 의 관리를 제공합니다. 

주목할 부분으로는 아래와 같습니다. (개인 중심의 해석)
1. 개발 플랫폼으로 많은 기능들이 VS 2010 Add In 되어 개발에 편리함과 생산성에 향상
2. BCS(Business Connectivity Services) 에서는 기본의 BDC(Business Data Catalog) 에서 제공하지 않았던  Write(쓰기) 의 지원
3. 기존의 솔루션(WSP)이 중앙 관리에 설치되어 전체가 적용이 되던 부분이 SandBoxed Solution 이라는 새로운 개념이 도입되어 사이트 단위로 솔루션 배포와 활용이 가능 

새로운 기능의 추가에 대한 요약 

개발자 생산성
Visual Studio 2010 SharePoint 프로젝트 타입과 항목?
Visual Studio 2010 SharePoint 툴 확장
Visual Studio Extensions For SharePoint 업그레이드
Windows 7 and Windows Vista 운영체제 지원
SharePoint Designer 2010
Developer Dashboard
Team Foundation Server 2010 통합
  
다양한 플랫폼 서비스
SharePoint 리본
SharePoint 다이얼로그(새창)
Silverlight 웹 파트
List 참조와 관계
Business Connectivity Services (BDC 의 새로운 버전)
LINQ to SharePoint


유연한 배포
Sandboxed Solutions
SharePoint Online
Upgrading Solutions

개발자에 의해 SharePoint 에 포함된 핵심 솔루션 종류 
우선은 Visual Studio 2010 SharePoint Designer 2010 을 이용하여 솔루션 개발을 보다 쉽게, 빠르게, 유연하게 만들 수 있습니다. SP Designer 를 이용하여 Web UI 를 구성하고 코드의 부분은 개발자가 구현하여 빠른 생산성을 기대한다고 합니다. 국내에서의 경험으로는 디자이너 분들이 Designer Tool core.CSS 의 경험 부재로 인해 쉽지는 않을 것 같지만, Workflow 같은 경우라면 wsp 파일로 내보내기가 지원된다고 하니, 개발 이외의 작업 분담과 개발자는 코딩에 집중하는 업무의 형태도 불가능하지는 않을 것 같습니다. 

문서와 목록 관리의 변화된 부분은 아래와 같습니다.
1. 규모가 큰 목록 지원
2. 향상된 검증 (Form?)
3. LOB(Line Of Business) 시스템 연결 

기타 나머지 부분은 아래와 같습니다.
  -  Workflow SharePoint Workspace 를 포함하는 Client 어플리케이션의 향상
  -  태깅과 평가에 대한 지원
  -BCS 에서 Write(쓰기) 가 가능하므로 기존의 데이터 관리에 유리

WF 를 이용하여 국내 기업에서 구매할 수 있을 정도의 전자결재 제품이 출시된다면 SharePoint 가 널리 퍼질 것 같기도 합니다.
(전자결재 전문가와 함께 오픈 소스를 시작하고 싶은 소망이 있습니다.)  

기존의 주 기능에 수정 및 확장 가능한 부분은 아래의 테이블과 같습니다.

주 기능 기본 기능 확장 가능 부분
Sites 목록과 문서 라이브러리의 자료에 저장과 가져오기시 쉽고 유연한 방법의 제공 웹 파트, 마스터 페이지, 페이지, 델리게이트 컨트롤, InfoPath 양식, Word 변환 서비스를 활용하는 솔루션, Access 서비스 이용
Communities 사용자에 관련된 기능태깅과 평가 기능 정의된 검색, 검색 웹 파트, 태깅 과 평가 및 사용자 커스텀 인터페이스
Content 웹 페이지, 문서, 레코드 등의 자료 관리 커스텀 페이지 타입, 필드 컨트롤, 컨텐트 타입, 문서 세트, 원격 블로그 저장 프로바이터, 워크플로와 Word 서비스. 레코드 관리의 확장과 공용 웹 사이트 확장
Search Database 를 포함한 SharePoint 의 안과 밖의 검색 기능 정의된 검색 결과 변환. 자료의 네비게이션과 위치 파악을 나타내는 그리고 다른 데이터 스토어의 연결을 하는 웹 파트. IFilter 와 프로토콜 핸들러
Insights 엑셀 서비스, 웹 페이지 표시, Dashboard, KPI 기본 기능의 기능 확장
Composites 해당 플랫폼을 이용한 솔루션 기능 웹 파트, 워크 플로, InfoPath 폼 서비스는 사용자가 활용 가능한 툴 사용 증가?


직접 사용해보지 않고 문서만 보고 글 작성을 하려고 하니 한계가 많습니다. 점차 기능을 활용해보고 문서를 수정하도록 하겠습니다 


SharePoint 2010 설치

안녕하세요?

Will입니다. 이번에는 SharePoint 2010의 설치에 대한 내용을 쓰도록 하겠습니다.

 기본적으로 Window2008 R2에 MSSQL2008 을 설치 하여서 SharePoint를 설치 하도록 하겠습니다.

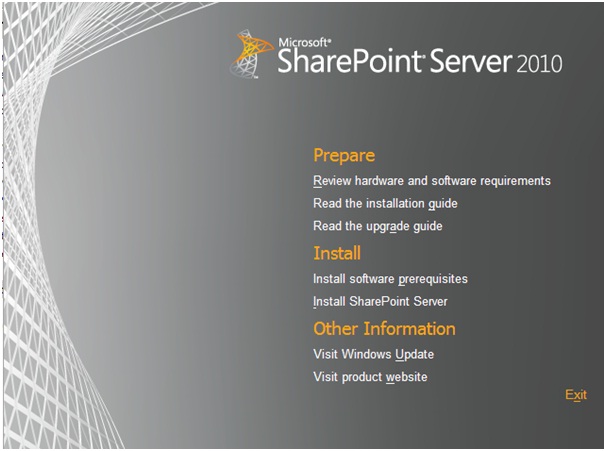
1.SharePiont Server 2010 설치 파일을 더블 클릭 하면은 아래와 같은 화면이 나옵니다 Install -> Install software prerequisites 를 클릭하여서

SharePoint의 구성 시 필요한 사항들을 체크 및 설치를 합니다.
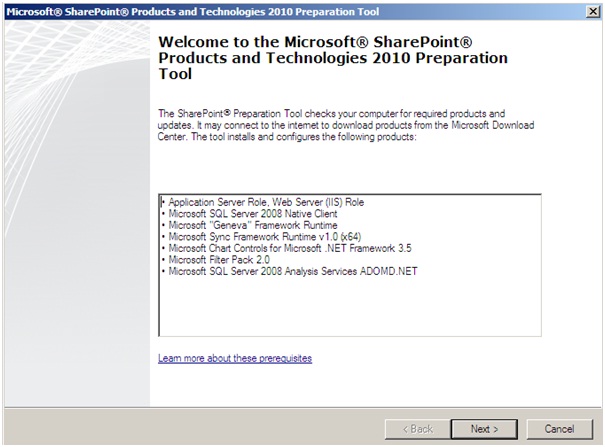
2.  해당 구성들을 확인 하기 위해서 넥스트.
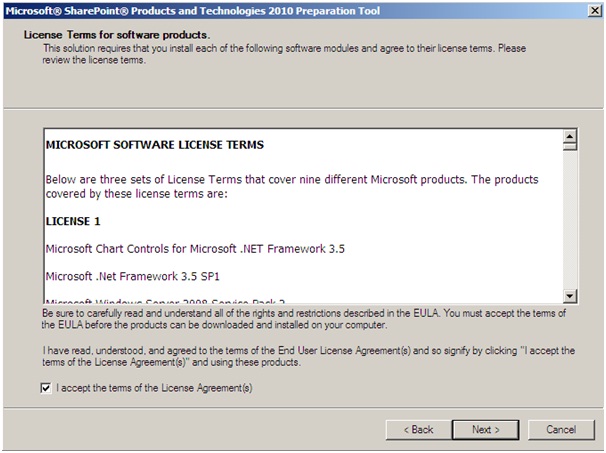
3. 해당 설치 프로그램을 설치 할 수 있도록 I accept 체크 넥스트
 

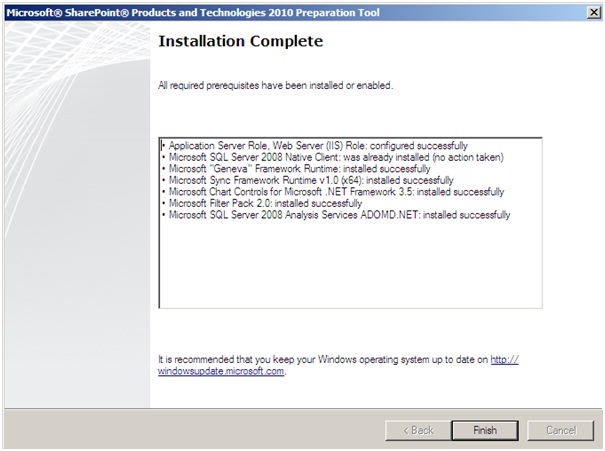
4. 설치가 완료 되었으면은 완료.
5. 이제 본격적으로 SharePoint를 설치해 보도록 하겠습니다. Install -> Install SharePoint Server 클릭.

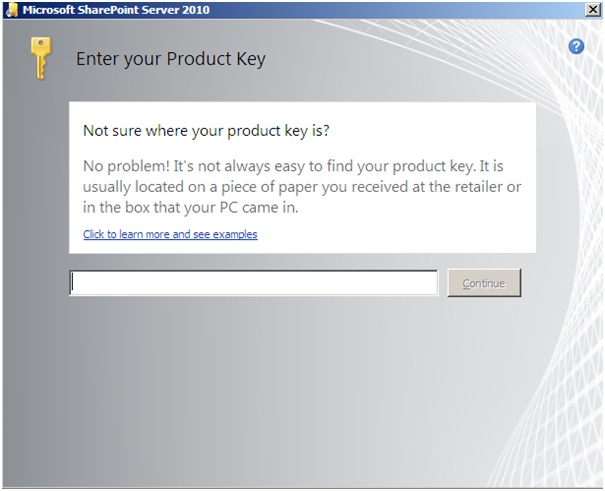
 6. SharePoint 2010 키를 입력 합니다. 그리고 계속 클릭.
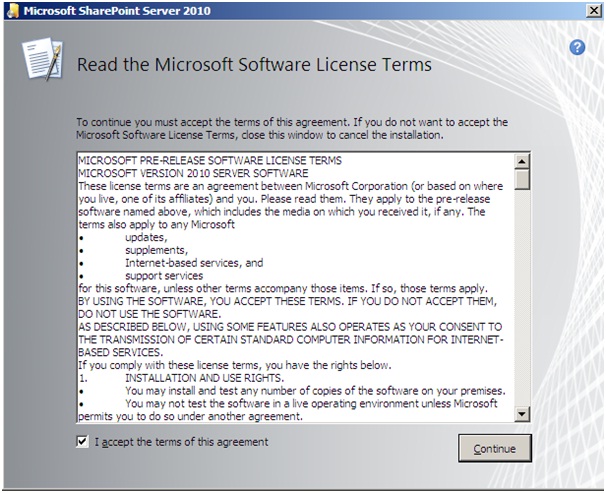
7. License에 대한 동의를 하고 계속
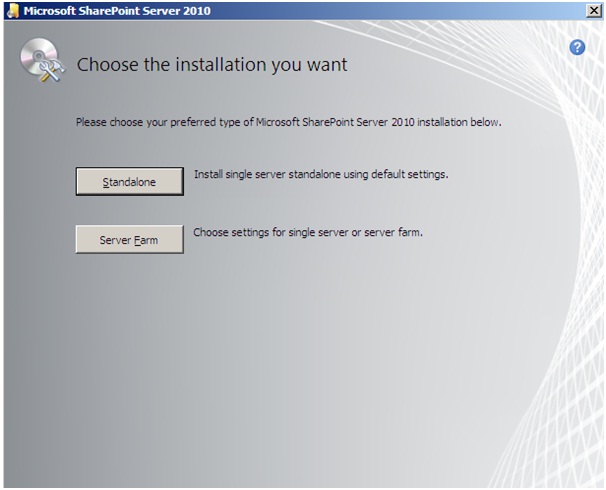
8.  독립된 서버가 아닌 서버 팜으로 구성 하도록 하겠습니다. Server Farm 클릭.
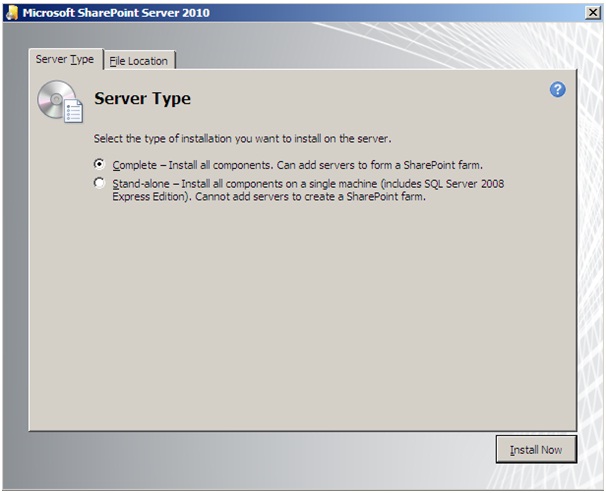
9. Server Type에서 Stand - alone 이 아닌 전체를 설치 하도록 하겠습니다 Complete 선택 -> 지금 설치.
10. 클릭이 완료 되면은 지금 진행중인 화면이 나옵니다.
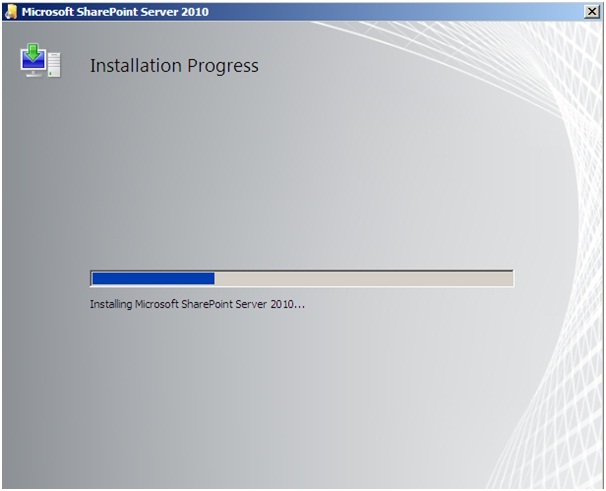
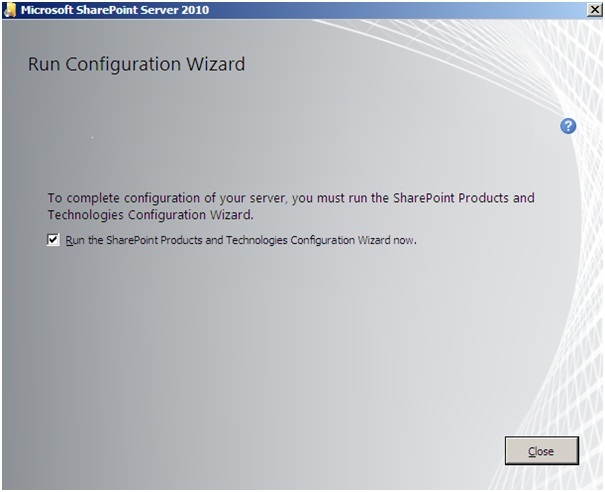
11.  설치가 완료 되었으며 이제 SharePoint의 구성이 남았습니다 Configuration Wizard를 선택한 상태에서 닫기를 선택.
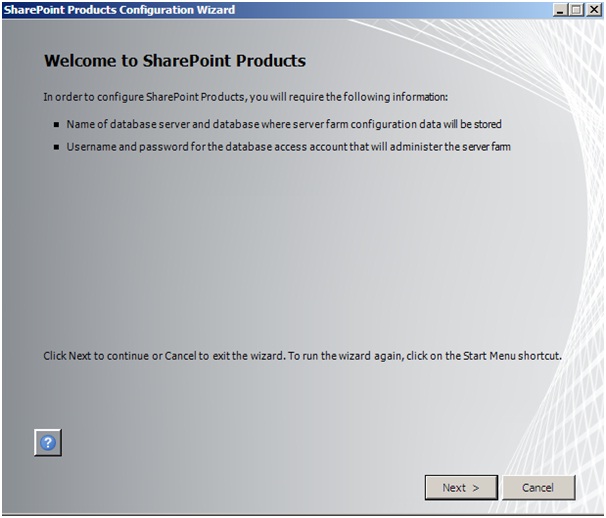
12.  SharePoint를 구성 하기 위한 요건들 확인 후 넥스트
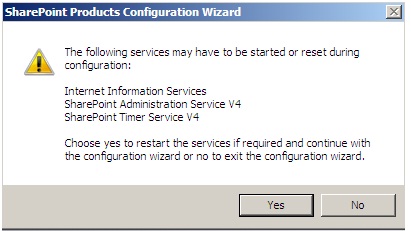
13. 해당 서비스들이 돌아 갈수 있도록 수락 Yes 클릭.
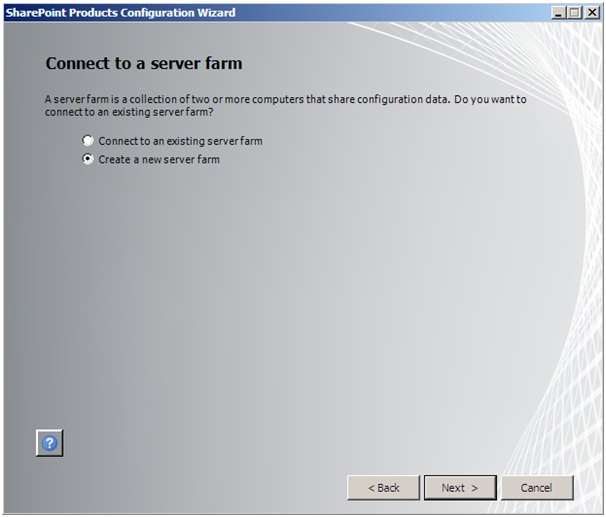
14. 현재 구성되어 있는 팜이 없으므로 Create a new server farm 체크 -> 넥스트.
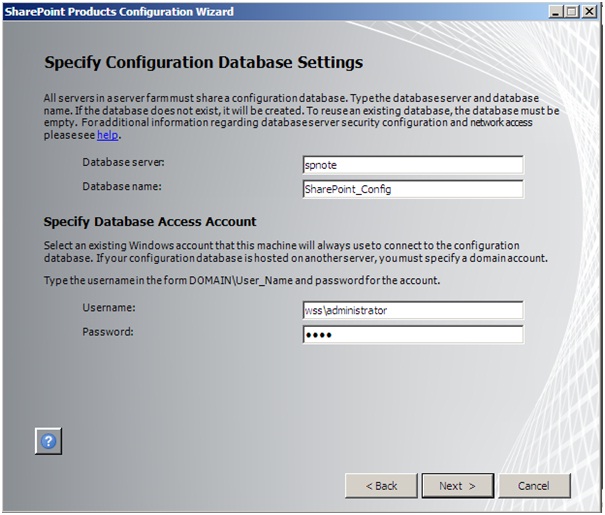
15. DB정보와 사용자 아이디 및 비번을 넣고 넥스트.
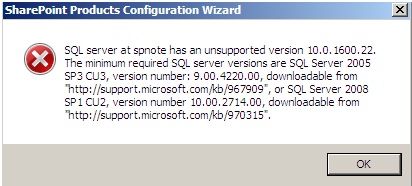
16. 켁 에러가 나오네요.... 읽어 보니 SQL Server 2008 SP1 CU2를 설치 안했다는 에러 네요. SQL Server 2008 SP1 을 설치 하도록 하겠습니다

http://www.microsoft.com/downloads/details.aspx?FamilyID=66ab3dbb-bf3e-4f46-9559-ccc6a4f9dc19&displaylang=en <-- 해당 url에서 다운을 받고 설치.
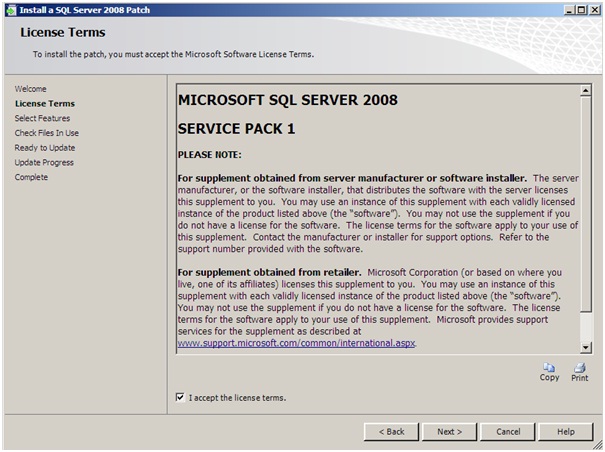
17.  동의 하고 넥스트.
18. 전체 선택 후 (MSSQLSERVER는 무조건 되어있어야 함 안되있으면은. 취소 했다가 다시 클릭)-> 넥스트
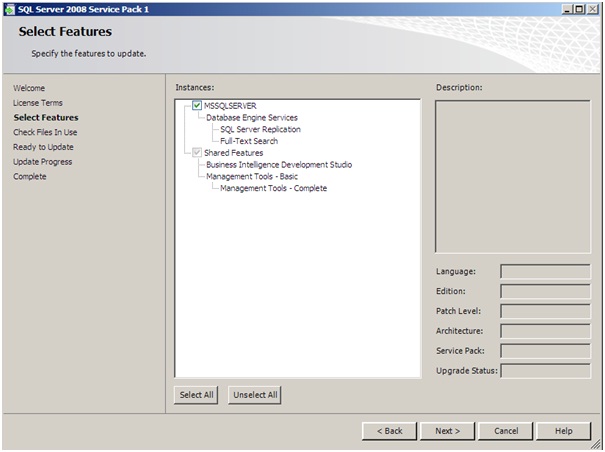
 19. 파일 체크가 완료 되면은 넥스트 클릭.
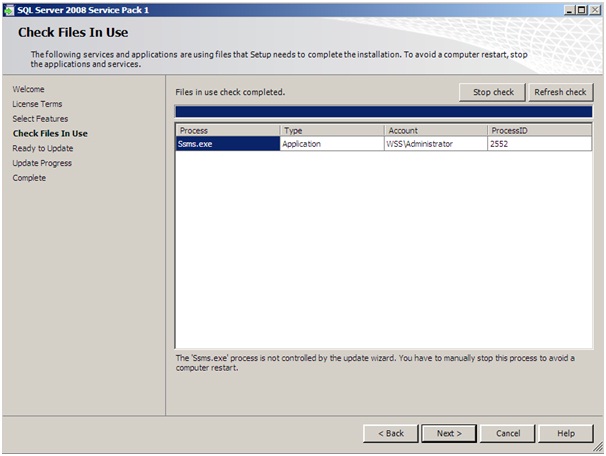
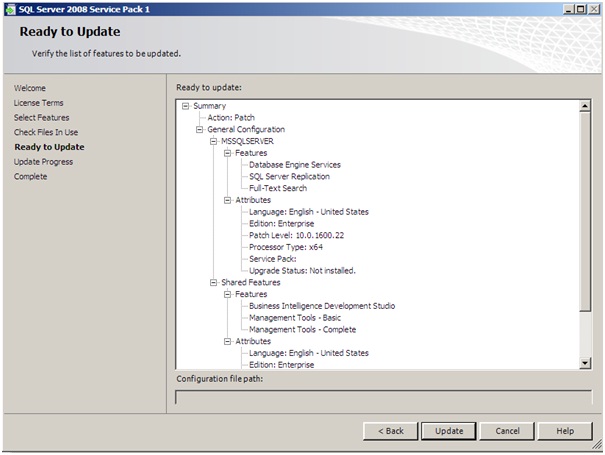
20. 해당 구성 확인후 Update 클릭.
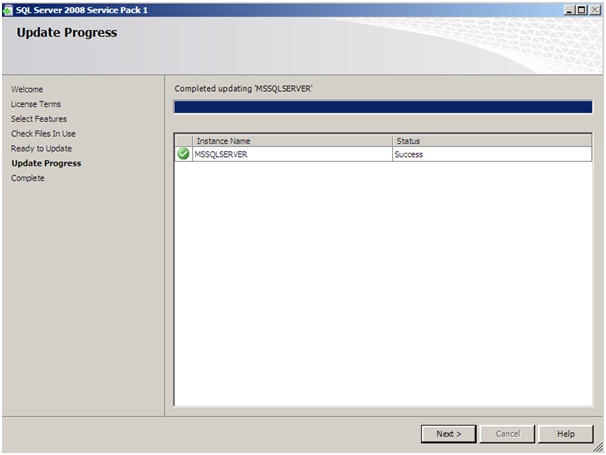
21. 설치가 성공 하면은 넥스트. -> 완료 화면 닫기 클릭.
22. 다시 시작 -> 모든프로그램 -> SharePoint 2010 -> Configuration Wizard 클릭 후 -> 12번에서 15번까지 다시 설정

켁;; 그래두 똑같은 에러가 ㅡㅡ  알아 보니 버젼이 틀려서 안되는 거였네;; 10.00.2714.00 찾기 위해서 해당 Url로 이동

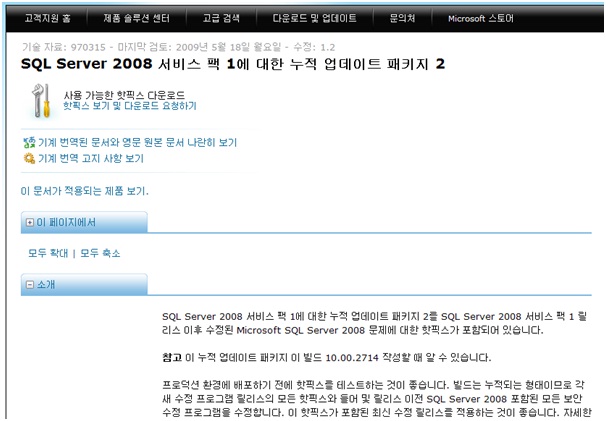
http://support.microsoft.com/kb/970315

23. 해당 페이지가 나오면은 핫픽스 보기 및 다운로드 요청 하기 클릭.
 

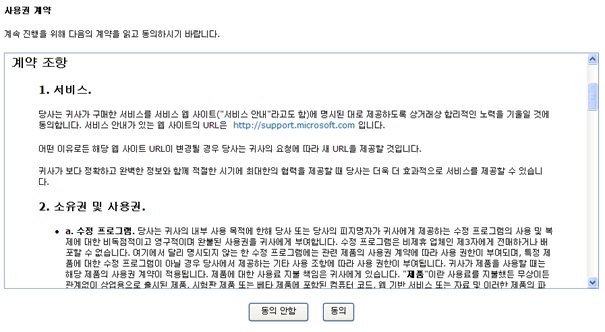
 24. 약관의 동의 후 동의를 클릭.
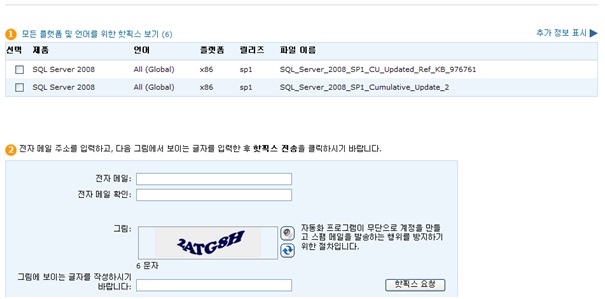
25. 파일 이름에 x64 인지 체크 후 해당 파일 두개 선택 후 메일주소를 쓰면은 해당 파일을 다운 받을 수 있는 url경로와 압축 풀시 키값이 날라 온다.
26. 내용은 이렇다. 요기 라구 체크 한데서 다운을 받고 비밀 번호는 그 밑에 있는걸 쓰면은 해당 핫픽스를 다운 받을 수 있다.

IMPORTANT INFORMATION

For your convenience, we put the hotfix that you requested on an HTTP site. You can download the hotfix from this site without us filling up your e-mail inbox.

WARNING This hotfix has not undergone full testing. Therefore, it is intended only for systems or computers that are experiencing the exact problem that is described in the one or more Microsoft Knowledge Base articles that are listed in "KB Article Numbers" field in the table at the end of this e-mail message. If you are not sure whether any special compatibility or installation issues are associated with this hotfix, we encourage you to wait for the next service pack release. The service pack will include a fully tested version of this fix. We understand that it can be difficult to determine whether any compatibility or installation issues are associated with a hotfix. If you want confirmation that this hotfix addresses your specific problem, or if you want to confirm whether any special compatibility or installation issues are associated with this hotfix, support professionals in Customer Support Services can help you with that. For information about how to contact support, copy the following link and then past it into your Web browser:

http://support.microsoft.com/contactus/

For additional support options, please copy the following link and then paste it into your Web browser:

http://support.microsoft.com/

Before you install this hotfix
------------------------------

If you decide to install this hotfix, please note the following items:

Do not deploy a hotfix in a production environment without first testing the hotfix.

Back up the system or the computer that will receive the hotfix before you install the hotfix.

Additional hotfix information
-----------------------------

This hotfix package uses a password. Therefore, you must enter for each package the password that we included in this e-mail message. To make sure that you enter the correct password, we recommend that you highlight, copy, and then paste the password from this e-mail message when you are prompted. If you do not enter the correct password, you cannot install the hotfix.

NOTE Passwords are set to expire every seven days. Download the package within the next seven days to make sure that you can extract the files. If there are fewer than seven days left in the password change cycle when you receive this e-mail message, you receive two passwords. If this is the case, use the first password if you download the hotfix package before the date in the "Password Changes On" field that is listed in the table at the end of this e-mail message. Use the second password if you download the hotfix package after the date in the "Password Changes On" field.

NOTE For your convenience, we send the hotfix location to you in a hyperlink. To connect to this hotfix location, you can click the hyperlink in the "Location" field that is listed in the table at the end of this e-mail message to have your Web browser open that location. However, sometimes e-mail program settings disable hyperlinks. If the hyperlink in this e-mail message is disabled, please copy the hyperlink in the "Location" field and then past it into the address box of your Web browser. Make sure that you include the exact text (without spaces) between the parentheses in the http:// address.


Package:
-----------------------------------------------------------
-----------------------------------------------------------
KB Article Number(s): 948567, 949862, 953626, 956574, 956686, 960616, 960976, 960978, 961106, 961146, 961237, 961282, 961325, 961340, 961526, 961648, 961695, 961760, 961803, 961811, 961920, 961928, 961935, 961979, 962003, 962008, 963061, 963117, 963118, 963659, 965217, 965221, 966306, 967148, 967157, 967161, 967162, 967164, 967169, 967178, 967205, 967206, 967315, 967337, 967480, 967523, 967524, 967552, 967561, 967614, 967749, 967821, 967889, 967983, 967984, 968080, 968085, 968152, 968159, 968290, 968369, 968449, 968539, 968543, 968615, 968722, 968740, 968741, 968742, 968834, 968900, 969007, 969050, 969086, 969099, 969131, 969235, 969357, 969362, 969386, 969453, 969467, 969469, 969513, 969528, 969588, 969611, 969653, 969775, 969793, 969844, 969872, 969890, 969942, 969997, 970014, 970044, 970058, 970070, 970133, 970150, 970160, 970184, 970198, 970255, 970287, 970315, 970324, 970349, 970399, 970461, 970507, 970538, 970550, 970551, 970654, 970666, 970713, 970719, 970731, 970823, 970824, 970909, 970966, 970989, 971020, 971049, 971051, 971057, 971064, 971068, 971125, 971132, 971136, 971402, 971482, 971491, 971622, 971640, 971683, 971753, 971772, 971780, 971898, 971914, 971934, 971985, 972068, 972075, 972101, 972184, 972197, 972198, 972200, 972201, 972203, 972207, 972261, 972271, 972367, 972395, 972440, 972458, 972498, 972521, 972537, 972545, 972650, 972681, 972687, 972759, 972763, 972777, 972833, 972856, 972893, 972936, 972939, 972969, 972984, 973087, 973090, 973102, 973103, 973192, 973200, 973204, 973223, 973250, 973251, 973255, 973257, 973292, 973300, 973302, 973303, 973524, 973580, 973588, 973602, 973696, 973877, 973897, 973953, 974076, 974231, 974262, 974269, 974276, 974289, 974371, 974398, 974404, 974712, 974766, 974816, 974948, 975055, 975171, 975272, 976761
Language: All (Global)
Platform: x64
Location: (http://hotfixv4.microsoft.com/SQL%20Server%202008/sp1/SQL_Server_2008_SP1_CU_Updated_Ref_KB_97/10.00.2740.00/free/398850_intl_x64_zip.exe)   <--요기
Password: )llB]dsAM  <-- 요기

-----------------------------------------------------------
KB Article Number(s): 960616, 961106, 961760, 961811, 963061, 965217, 967206, 967337, 967561, 967983, 967984, 968085, 968290, 968449, 968834, 968900, 969007, 969131, 969235, 969362, 969469, 969588, 969775, 969872, 970070, 970184, 970198, 970255, 970315, 970461, 970550
Language: All (Global)
Platform: x64
Location: (http://hotfixv4.microsoft.com/SQL%20Server%202008/sp1/SQL_Server_2008_SP1_Cumulative_Update_2/10.00.2714.00/free/381569_intl_x64_zip.exe) <-- 요기
Password: +iSZWIF <-- 요기


NOTE Make sure that you include all the text between "(" and ")" when you visit this hotfix location.

27. SP1을 깔아서 그런지. 핫픽스 두개 중에 한개만 설치가 된다 압축을 풀고 나서 끝자리가 315로 되어 있는건 설치가 안되고 다른 건 설치가 된다 SP1에 똑같은 버젼의 315가 포함이 되어 있어서 설치가 안됨.

무튼 한개의 핫픽스를 깔고 (까는 방법은 SP1 설치 방법과 같다 위에 그림들을 참고 하시기를..)

28. 다시 12에서 16번 까지 하였더니 이번에는 해당 버젼이 맞아서 넘어 감. 비밀 번호를 넣고 넥스트.
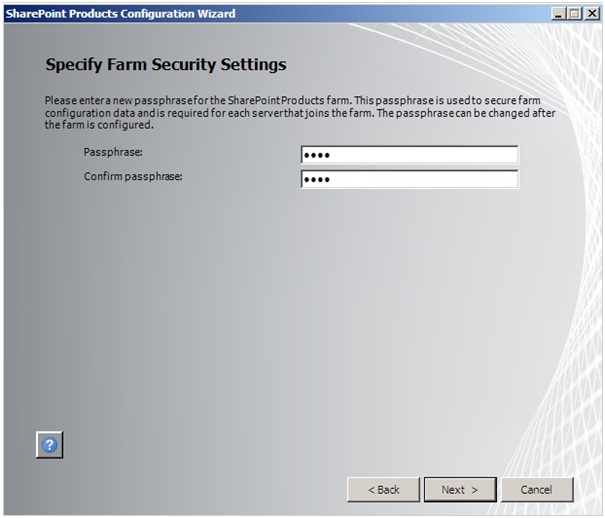
29. portnumber를 5000번으로 지정 하도록 하겠습니다. 그리고 인증은 NTLM으로 하도록 하겠습니다 그리고 넥스트
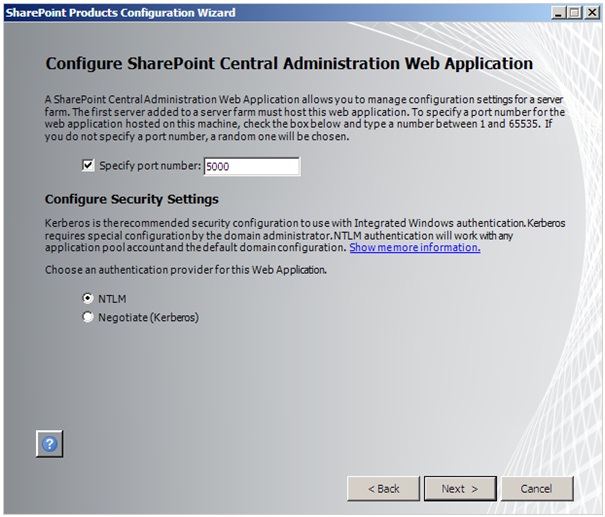
30. 해당 구성이 맞는지 체크를 하고 넥스트.  여기가 맞나;; SharePoint 구성의 진행 화면이 나옴..
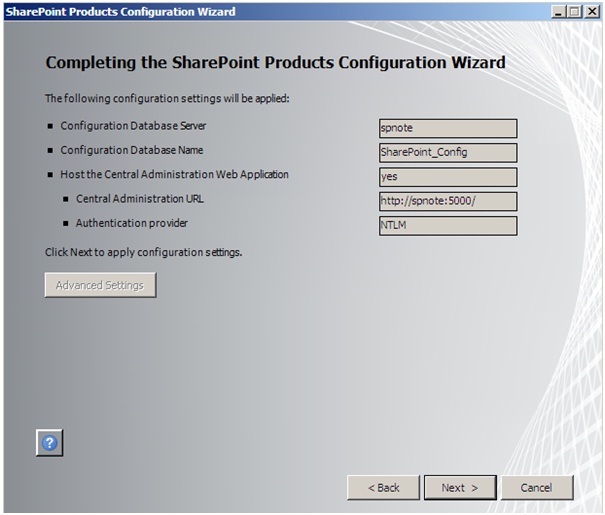
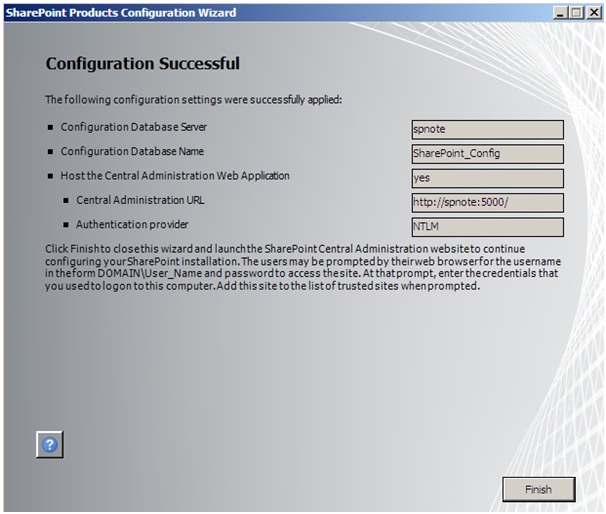
31. 구성이 완료 되었다는 페이지가 나오고 완료 클릭.
32. 해당 구성 화면을 들어가 보면은.. SharePoint 2010의 구성 페이지를 볼 수 있음.
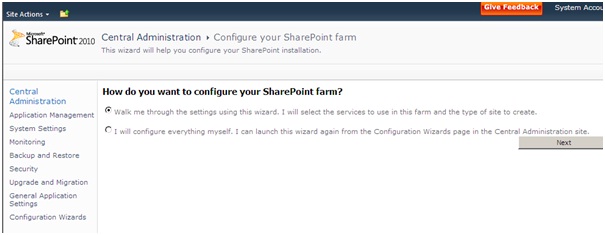
SharePoint 2010은 언듯 봐도 참많이 바뀌었다는 생각이듬. 리본 메뉴가 생겨 났으며, SPS사라지구 각각의 구성으로 밖으로 나와 있는 것을 볼 수 있었음. 해당 구성 방법은 이번주 내로

추가 해서 올리도록 하겠습니다 .

저도 피곤한지라... 짬날때 조금씩 하구 있으니.. 많은 양해를;;;ㅋㅋ

 궁금하시거나 모르시는게 있으면은 댓글을 달아 주시거나~ 메일을 보내주시면은 답변을 드리도록 하겠습니다.


SharePoint Custom Field(Button)

안녕하세요?
오늘은 저번에 공지한대로 커스텀 텍스트 필드에 버튼 컨트롤을 넣어서 작업을 해보겠습니다.

우선 이번에는 저번과 다르게 디폴트 템플릿도 만들 것이고 display할 때 기본 컨트롤 뿐만 아니라.

버튼이 함께 들어 가도록 하겠습니다.

1. class를 생성 하고 SPField를 상속을 받도록 하겠습니다.

2. 그냥 빌드를 하면은 저번과 같이 에러가 나게 됩니다. 생성자를 넣지 않아서 나는오류입니다.
   그럼 저번과 같이 생성자 또한 정의를 해보겠습니다.

3. 그런 다음 FiellRenderingControl을 상속을 받고 제가 지정한 class를 넣어 주도록 하겠습니다.

 4. 그리고 금방 생성한 class에 baseFieldControl을 상속 받도록 하겠습니다.

5. 그런 다음 아까 말했듯이 디폴트 템플릿을 사용자 지정으로 넣습니다.(아무 이름이나 상관 없음.)

6. ControlTemplate를 생성 합니다.(이름 상관 없음.)

7. ControlTemplate의 내용은 아래의 그림과 같이 정의를 해줍니다.(Source단 참조, Template안에 컨트롤 및 테그 아무렇게 넣어도됨.)
  * SharePoint:RenderingTemplate 의 ID는 디폴트 템플릿의 사용자 이름으로 해야됨.(아래 그림 참조)

8. 컨트롤을 정의 하겠습니다 Template에 있는 텍스트 박스 하나, Display에 뿌릴 테이블 하나, 버튼 등록을 위한 버튼 하나.

9. 텍스트박스를 넣기 쉽게 하기 위해서 캡슐화 하겠습니다.

10. 값을 저장 하고 빼오기 위해서 Value를 상속 받고 Text의 값의로 설정 하도록 하겠습니다.


11. 그리고 버튼을 클릭 이벤트를 생성 하도록 하겠습니다.


12. 이제 Display시 뿌려질 내용을 하나의 함수를 생성 해서 넣도록 하겠습니다. (Microsoft.SharePoint.WebControls.OWSForm이라는 것을 참조)

13. 해당 페이지에 뿌려줄때 동작 하는 CreateChildControls를 상속 받는다 (필드가 널인지 체크, base컨트롤 생성 및 display모드시 버튼 등록, New모드시 기본값설정)

14. SharePoint에서 Display이시 컨트롤을 랜더링을 관장하는 RenderFieldForDisplay를 상속 받는다.(아까 생성한 Table을 뿌림.)


15. 이벤트에 해당 컬럼의 값을 +1 시킨다.


16. 필드 타입 정의 XML (저번 XML그대루 같다가 씁니다;; 편집해서 쓰세요~)

17. 해당 dll은 객에 등록, Controltemplate랑 xml은 Controltemplates랑 xml폴에 각각 복사 후 iisreset

완료 화면 1)

완료 2)


완료 3)


완료 4)


완료 6)

소스 1)

[code:html;In=on] 

    public class CustomButton : Microsoft.SharePoint.SPField
    {
        public CustomButton(SPFieldCollection fields, string fieldName)
            : base(fields, fieldName)
        {
        }//

        public CustomButton(SPFieldCollection fields, string typeName, string displayName)
            : base(fields, typeName, displayName)
        {
        }//

        public override BaseFieldControl FieldRenderingControl
        {
            get
            {
                BaseFieldControl bfc = new CustomButtonBaseControl();
                bfc.FieldName = InternalName;
                return bfc;
            }
        }//FieldRenderingControl

    }//class

[/code]

소스 2)

 [code:html;In=on]

    public class CustomButtonBaseControl : BaseFieldControl
    {

        protected TextBox Ctb_txt;
        public Button spnote_btn;
        private Table table;

        protected override string DefaultTemplateName
        {
            get
            {
                return "btn_SPNote_Template";
            }
        }//DefaultTemplateName

        protected override void CreateChildControls()
        {
            if (base.Field == null)
            {
                return;
            }

            base.CreateChildControls();
           
            if (base.ControlMode == SPControlMode.Display)
            {
                spnote_btn = new Button();
                spnote_btn.Click += new EventHandler(spnote_btn_Click);
                spnote_btn.ID = "spnote_btn";
                spnote_btn.Text = "버튼테스트";
                DisPalyFormAdd();
            }
            else
            {
                Ctb_txt = (TextBox)this.TemplateContainer.FindControl("SPNote_txt");
                Ctb_txt.Enabled = false;
                if (base.ControlMode == SPControlMode.New)
                {
                    Ctb_txt.Text = "0";
                }
            }

        }//CreateChildControls

        public void DisPalyFormAdd()
        {
            Microsoft.SharePoint.WebControls.OWSForm form =
                new Microsoft.SharePoint.WebControls.OWSForm();
            Controls.Add(form);
            table = new Table();
            form.Controls.Add(table);
            table.Width = Unit.Percentage(80);
            TableRow row = new TableRow();
            table.Rows.Add(row);
            row.BackColor = Color.White;
            TableCell cell = new TableCell();
            cell.Width = Unit.Pixel(150);
            cell.Attributes["class"] = "ms-vb2";
            cell.Controls.Add(spnote_btn);
            row.Cells.Add(cell);
               
        }//DisPlayFormAdd

        protected override void RenderFieldForDisplay(HtmlTextWriter output)
        {
            base.RenderFieldForDisplay(output);
            if (table == null)
            {
                DisPalyFormAdd();
            }

            table.RenderControl(output);

        }//RenderFieldForDisplay

        void spnote_btn_Click(object sender, EventArgs e)
        {
            Web.AllowUnsafeUpdates = true;
            String itemvalue =  this.ItemFieldValue.ToString();
            this.ItemFieldValue = (int.Parse(itemvalue) + 1).ToString();
            this.Item.Update();
            Web.AllowUnsafeUpdates = false;
            string responseurl= this.Page.Request.Url.ToString();
            this.Page.Response.Redirect(responseurl);
           
        }//spnote_btn_Click

        public virtual string Text
        {
            get
            {
                this.EnsureChildControls();
                if (this.Ctb_txt == null)
                {
                    return null;
                }
                return this.Ctb_txt.Text;
            }
            set
            {
                this.EnsureChildControls();
                if (this.Ctb_txt != null)
                {
                    this.Ctb_txt.Text = value;
                }
            }
        }//Text

        public override object Value
        {
            get
            {
                return this.Text;
            }
            set
            {
                if (base.Field != null)
                {
                    this.Text = base.Field.GetFieldValueForEdit(value);
                }
            }
        }//Value

    }//class

[/code] 소스 3)

[code:html;In=on]

<?xml version="1.0" encoding="utf-8" ?>
<FieldTypes>
  <FieldType>
  <Field Name="TypeName">사용자정의버튼</Field>
  <Field Name="ParentType">Text</Field>
  <Field Name="TypeDisplayName">사용자정의버튼</Field>
  <Field Name="TypeShortDescription">사용자정의버튼</Field>
  <Field Name="UserCreatable">TRUE</Field>
  <Field Name="FieldTypeClass">SPnote.SharePoint.SPField.SPFeildText.CustomButton, SPnote.SharePoint.SPField, Version=1.0.0.0, Culture=neutral, PublicKeyToken=be2c734ef24c0327</Field>
  <RenderPattern Name="DisplayPattern">
   <Column HTMLEncode="TRUE" AutoHyperLink="TRUE" AutoNewLine="TRUE"/>
  </RenderPattern>
 </FieldType>
</FieldTypes>

[/code]

SharePoint Custom Field

SPFieldText 를 상속을 하여서 간단히 필드를 하나 만들어 보겠습니다.


SPFieldTextSharePoint에서 기본적으로 텍스트 박스 형태의 255길이의 문자를 쓸 수 있는 텍스트 박스 입니다.


우선 CS단을 만들고 해당 SPFieldText 를 상속 해 보겠습니다.


그리고 빌드를 하면은 에러가 나게 되어있습니다.

베이스 컨트롤의 생성자 들을 안 넣었기 때문입니다. 


이런 식으로 넣어 주면은 에러 없이 돌아 갑니다.


다음으로 해당 컨트롤에 필드랜더링컨트롤을 오버라이드 해서 상속을 받아서 커스텀

된 해당 필드를 넣어 보도록 하겠습니다.


우선 컨트롤을 오버라이드를 하고,

클래스를 하나 만들어서 아래와 같이 소스를 채워 넣습니다.

그 다음 금방 만든 class파일에 가서 basefieldcontrol을 상속 해서 만들어 둡니다.


텍스트 박스를 바꿔야 하기 때문에 우선 텍스트 박스를 상속하겠다고 선언 하고, 그리고 기본 템플릿을

 SharePoint FieldText 가 사용 하는 “TextField”라는 템플릿을 사용 하도록 하겠습니다.


우선 값을 넣을 수 있는 Text라는 인자 값을 리펙터링으로 선언 해서 텍스트박스 값을 집어 넣습니다.


그리고 value를 오버라이드 해서 해당 값을 채워 줍니다.


그리고 나서 CreateChildControls를 오버라이드 해서 해당 컨트롤에 뿌려 질 때 할 행동들을 집어 넣을

수 있습니다. (편집과 새로 만들기 시 값을 넣어줘야 함.)

Findcontrol로 해당 필드를 찾아서 넣어 주면은 랜더링이 끝나고 나서 값을 채울 때 해당 필드가 널 값이

 아니기 때문에 값을 넣게 됨( 참고 : 해당 필드 값은 DefaultTemplates.ascx에 정의 되어있음. )

* 기본템플릿에서 TextField로 정의 되어있으니 DefaultTemplates.ascx파일에서 검색을 하시면은 한결 이해가 쉽습니다.


key파일을 생성 하고 빌드 한 다음 객에 등록을 합니다.


그리고 xml파일을 하나 만들어서 해당 내용을 집어 넣습니다.

(xml이름은 : fldtypes_아무이름  ß이런 식으로 맞춰주어야지 moss에서 인식을 합니다.)

FieldTypeClass 에 해당 파일의 dll정보 와 해당 class명을 넣어 주고 나서 12 폴더 밑에 xml파일에 넣어 주고 iis reset하면은 끝)


완료1)

완료2)


완료3)


소스1)

[code:html;In=on]

public class CustomTextField : SPFieldText
{
        public CustomTextField(SPFieldCollection fields, string fieldName)
            : base(fields, fieldName)
        {
        }

        public CustomTextField(SPFieldCollection fields, string typeName, string displayName)
            : base(fields, typeName,displayName)
        {
        }

        public override BaseFieldControl FieldRenderingControl
        {
            get
            {
                BaseFieldControl cbc = new CustomTextBaseControl();
                cbc.FieldName = InternalName;
                return cbc;
            }
        }//FieldRenderingControl

}//class
[/code]

소스 2)

[code:html;In=on]

public class CustomTextBaseControl : BaseFieldControl
{
        protected TextBox customTextField;
       
        protected override string DefaultTemplateName
        {
            get
            {
                return "TextField";
            }
        }

        protected override void CreateChildControls()
        {
            base.CreateChildControls();
            if ((base.ControlMode != SPControlMode.Display) && (base.Field != null))
            {
                this.customTextField = (TextBox)this.TemplateContainer.FindControl("TextField");
            }

        }

        public virtual string Text
        {
            get
            {
                this.EnsureChildControls();
                if (this.customTextField == null)
                {
                    return null;
                }
                return this.customTextField.Text;
            }
            set
            {
                this.EnsureChildControls();
                if (this.customTextField != null)
                {
                    this.customTextField.Text = value;
                }
            }
        }


        public override object Value
        {
            get
            {
                return this.Text;
            }
            set
            {
                if (base.Field != null)
                {
                    this.Text = base.Field.GetFieldValueForEdit(value);
                }
            }
        }

}
[/code]

소스 3)

[code:xml;In=on]

<?xml version="1.0" encoding="utf-8" ?>
<FieldTypes>
 <FieldType>
  <Field Name="TypeName">사용자변경</Field>
  <Field Name="ParentType">Text</Field>
  <Field Name="TypeDisplayName">사용자변경텍스트</Field>
  <Field Name="TypeShortDescription">사용자변경텍스트</Field>
  <Field Name="UserCreatable">TRUE</Field>
  <Field Name="FieldTypeClass">SPnote.SharePoint.SPField.SPFeildText.CustomTextField, SPnote.SharePoint.SPField, Version=1.0.0.0, Culture=neutral, PublicKeyToken=be2c734ef24c0327</Field>
  <RenderPattern Name="DisplayPattern">
   <Column HTMLEncode="TRUE" AutoHyperLink="TRUE" AutoNewLine="TRUE"/>
  </RenderPattern>
 </FieldType>
</FieldTypes> 

[/code] 

이상으로 커스텀 필드에 대해서 마쳤습니다. 내용이 많이 부족 하지만 부족한 내용들은 개인들이 

채워 주시면은 고맙겠습니다.

다음에는 버튼 필드를 만들어 보도록 하겠습니다.                   


Popup Description balloon for Calendar Items

Calendar List can be used to share information about events, appointments, meetings and etc.


While I was using this list, I found that it will be better to popup its Description value when a user mouse over to each item cause it basically doesn't. Here's what the common columns of Calendar List are.

Column Name Description
Title (required) Single line of text
Location Single line of text
Start Time (required) Date and time
End Time (required) Date and time
Description Multiple lines of text


Unfortunately, Description column type is "Multiple lines of text" which means this column contains HTML tags that this have to be processed to remove HTML tags before showing its value. Here is a Display Item image and a raw value of Description column. 


  # Display Item

ex) Raw? Description Value
[code:html;ln=off]

<div>OCS R2 Verification Call for VSP</div>
<div>I support OC engineers to get it done successfully!</div>
<div>&nbsp;</div>
<div>Bold:<strong>&nbsp;Bold</strong> </div>
<div><font color="#ff9900"><font color="#000000">Font Color:</font> Orange</font></div>

[/code]


So, I need to remove HTML tags and I used Regular Expression.
ex) System.Text.RegularExpressions.Regex.Replace(Description Column Value, "<[^>]*>", string.Empty)


But where should I edit for this??? The answer is DefaultTemplates.ascx under
12 Hive\TEMPLATE\CONTROLTEMPLATES\... You can change this directly or override into new one. Calendar List has 3 ways "Day", "Week", "Month" to show Items and you need to change three Templates and they are.

  1. 2477: CalendarViewMonthItemTemplate
  2. 2539: CalendarViewDayItemTemplate
  3. 2617: CalendarViewWeekItemTemplate

    [Line Number: Template Name]


It is time to edit this template. Find A tag and put the title attribute with this codes and execute IISRESET.

[code:html;ln=off]

title="<%# System.Text.RegularExpressions.Regex.Replace(DataBinder.Eval(Container,"DataItem.Description",""), "<[^>]*>", string.Empty)%>"

[/code]


Now you can see the poping up Description value if you mouse over to any item that has Description value.


  # Demo poping up Description value

Custom Resource Provider for SharePoint Localization

 At first, I simply implemented 1. Custom Resource Provider which reads browser preference only but tricky customers wanted 2. Toggle Languages function. I used Cookie and Database for each user's localization data store and I described here how it's implemented.

* Click images below to see larger ones. 
 

1. Custom Resource Provder


2. SharePoint Localization to support a toggle function for two languages

Localization and Theme

1. SharePoint Localization and Limitation
What I have been exprienced on SharePoint Localizations are not practical for non-English users such as Variations and Team Sites. In my case, Korean customers want languages to be changed for their applications when they click buttons or by user's browser preference not like SharePoint Team Sites. As you might have noticed, replacing the asp menu to a custom one make them lose its original functions. Anyways they know this and liked it. I think adding a new layer that supports localization for asp menu is a better idea.

2. Custom Resource Provider
I have developed a custom resource provider and this supports browsers preference and toggling languages. To implement the function "Toggle Languages", I use Cookie and Database to save and retrieve user's language value.

3. SharePoint Theme
SharePoint Theme can be changed at  Home > Site Settings > Site Theme (_layouts/themeweb.aspx) but it affects all users.

4. Custom Control for user Theme enabled
Unfortunately, tricky Korean customers want individual themes such as clicking color buttons changes from current to new one and this doesn't affect other users. I created a Control to render custom css link for each user.


Here are sample images and click each image to see larger ones.
(Only menus are shown. Refer to the last image to see Page localzation)


SharePoint Page Localization
  # Localization Example ( can be toggled between English and Korean ) 


  # Individual Theme Demo