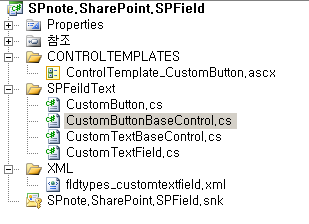
SPNote

SharePoint Notes

Document Library Pager 에서 RENDER FAILED 발생시에는?

Document Library 에서 다음 페이지를 눌렀을때 아래와 같은 에러 메시지가 나타났을때의 처리 방법

(상황)
Document Library 에는 약 140 개의 문서 Item 이 저장되어 있었고 정렬이 수정일 기준 내림차순으로 기본 뷰가 수정되어 최신 글이 상위로 가는 지극히 국내 환경에 맞는 일반적인 형태로 기본 뷰가 구성되어 있었습니다.

(에러 메시지)
- EN: "<!-- #RENDER FAILED# -->"
- KR: "<!-- #렌더에 실패하였습니다.# -->"

(이유)
이 에러가 발생하는 이유는 SQL Server 의 SharePoint 관리 계정의 언어가 non-English(US) 인 경우에 발생합니다. 이는 날짜 형식이 영어가 아닌 언어로 선택되어 있을 경우에 문제가 발생한다고 합니다.

당연히 한국에서는 한글 제품을 사용하므로 기본 한글이 설정하기에 이는 버그로 보는 것이 맞을 것 같지만 정식 지원이 만료되어 MS 에 패치 등을 요청해도 될지는 모르겠습니다.

(해결: △)
우선 관련 이슈에 대한 내용이 MS 지원에 나타나있으나 해결에는 도움이 되지 않았습니다.
1. Group By View
  - 여전히 렌더링 실패
2. DB 관리 계정의 언어 변경
  - 보통 이 계정이 시스템 계정으로 기 적용된 설정 등과 변경 후 영향을 고려하여 변경 불가

(대안)
사용자의 목적은 작성 글 기준 내림차순이므로 문제가 되는 날짜가 아닌 숫자인 ID 를 필드로 설정하면 수정일까지는 아니지만 작성일 기준 내림차순 효과를 나타낼 수 있습니다.

(참고)
Error message when you try to expand an entry in a Grouped By view
in Windows SharePoint Services, in SharePoint Server 2007, or in SharePoint Portal Server 2003
:
"<!-- #RENDER FAILED# -->"

Loopback configuration

2009년 여름 즈음 개발 PC 설치 작업을 하던 중 Windows 2003 Server 에 SharePoint 2007 을 설치하고 접속을 하려는데 인증창이 나타나고 별 생각없이 계정정보를 넣지만 인증이 되지 않고 급기야 3번이 넘어가서는 하얀색 화면이 나타났던 기억이 납니다. 로컬 PC 에서 개발할때는 보통 호스트 이름으로 접속을 하기에 자연스럽게 NTLM 인증이 되고 인증창 이슈 등은 없었는데 갑자기 나타난 상황에 잠시 당황을 했었습니다.

요즘엔 SPS 2003 환경에서 일을 하고 있고 설마 신규 환경을 구축할까 의문을 가지고 있었으나 의외로 많이 생기고 있습니다. Windows 2003 에 SPS 2003 을 설치, 포털 사이트를 하나 만들고 custom host header 에 ex. wss20.spnote.com (로컬) 을 할당하고 접속을 하니 과거에 경험했던 인증창이 계속 나타나고 HTTP 401.1 - Unauthorized: Logon Failed 이 나타났습니다.

# 401.1 - Unauthorized: Logon Failed

흠... 그런데 과거에 경험했음에도 한번에 Loopback 관련이라고 한번에 생각이 나지 않아서 Fiddler 부터 켜고 HTTP 코드부터 봤는데 역시나 검색하니 잘 나옵니다. 결론은 Windows 2003 Server Service Pack 1 부터 loopback 검사가 포함이 되서 그렇다고 합니다. 로컬 서버에서 FQDN 이나 custom host 로 접속하면 이 조건에 걸려서 로긴이 되지 않습니다. 이때 타 PC 등에서 custom host header 를 hosts 파일에 저장하고 접속을 시도하면 잘 되는데 여기서 이상한 상상하면 해결하기 어렵습니다.

접근 시도는 아래와 같습니다.
1. NTLM 인데 인증창이 나타남?
2. 올바른 계정인데도 401.1 나타남?

해결은 레지스트리를 수정해야 합니다.
1. Loopback 을 허용하는 사이트 추가 (권장)
2. Loopback 점검 제거 (disable)

# MS 에서 비추하지만 로컬이니 PASS

자세한 설명과 레지스트리 설정 방법은 아래의 링크를 참조하시면 됩니다.
http://support.microsoft.com/kb/896861 

SharePoint 2010 Debugging

SharePoint 2010 Debugging  은 SP 2007 과 거의 같습니다. (지금 SP 2007 web.config 가 없어서 확신이 없음...) 이전 글에서 AllowInefficientQueries 에러를 만나고 나서 이전 방식으로 Web.config 파일을 수정했는데, Visual Studio 에서 Script Debugging 이 잘 동작했습니다. 주석으로 Line 번호를 추가하였으니 문자열 검색 혹은 VS 에서 Ctrl + G 하시고 Line 번호 넣고 찾아가셔도 됩니다.

SharePoint 2010 Debugging is almost same with MOSS 2007. Find a web.config file for your Web Application and change values.
  - Path might be: "C:\Inetpub\wwwroot\wss\VirtualDirectoties\<YourWebApplicationName>”
    ex) C:\inetpub\wwwroot\wss\VirtualDirectories\intranet.spnote.dev80

수정할 부분은 아래와 같습니다.
What items should you change are below.

  1. CallStack : true
  2. customErrors : Off (case sensitive)
  3. debug: true

[code:xml;ln=off]

<?xml version="1.0" encoding="utf-8"?>
<configuration>
  <SharePoint>
    <SafeMode CallStack="true"> <!-- Line: 51 -->
  </SharePoint>
  <system.web>
    <customErrors mode="Off" /> <!-- Line: 341 -->
    <debug="true">              <!-- Line: 350 -->
  </system.web>
</configuration>

[/code]

위 설정을 완료했음에도 아래의 메시지가 나타날 수 있습니다.
Even though you have configured the values on web.config, you may encounter an error screen below.

image

이때 주소가 /_layouts/* 로 시작된 것이라면 이 Virtual Directory 내의 Web.config 파일도 수정을 해야합니다. 이때는 customErrors Mode 만 Off 로 설정하면 됩니다.
If the URL is like /_layouts/* then you need to change the web.config in _layouts(Virtual Directory) as well. You can simply change customErros Mode to Off.
  - Path: 14 HIVE\TEMPLATE\LAYOUTS\web.config

image

[참고]
- Download Web.config: web.config.zip (9.48 kb)

SharePoint Custom Field(Button)

안녕하세요?
오늘은 저번에 공지한대로 커스텀 텍스트 필드에 버튼 컨트롤을 넣어서 작업을 해보겠습니다.

우선 이번에는 저번과 다르게 디폴트 템플릿도 만들 것이고 display할 때 기본 컨트롤 뿐만 아니라.

버튼이 함께 들어 가도록 하겠습니다.

1. class를 생성 하고 SPField를 상속을 받도록 하겠습니다.

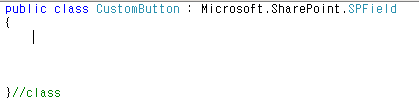
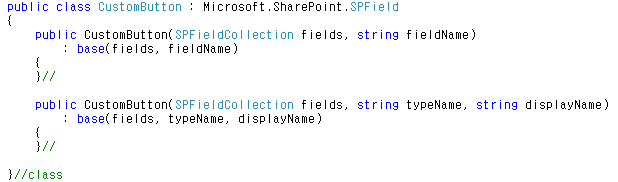
2. 그냥 빌드를 하면은 저번과 같이 에러가 나게 됩니다. 생성자를 넣지 않아서 나는오류입니다.
   그럼 저번과 같이 생성자 또한 정의를 해보겠습니다.

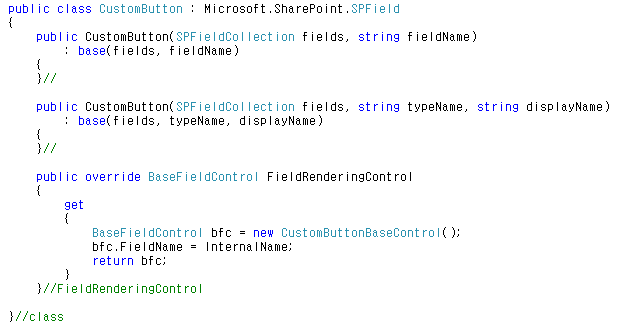
3. 그런 다음 FiellRenderingControl을 상속을 받고 제가 지정한 class를 넣어 주도록 하겠습니다.

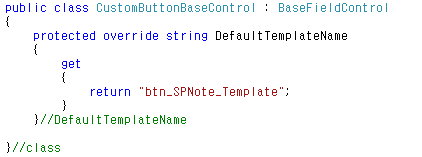
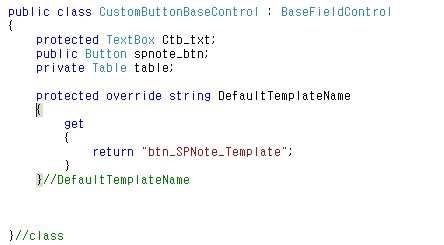
 4. 그리고 금방 생성한 class에 baseFieldControl을 상속 받도록 하겠습니다.

5. 그런 다음 아까 말했듯이 디폴트 템플릿을 사용자 지정으로 넣습니다.(아무 이름이나 상관 없음.)

6. ControlTemplate를 생성 합니다.(이름 상관 없음.)

7. ControlTemplate의 내용은 아래의 그림과 같이 정의를 해줍니다.(Source단 참조, Template안에 컨트롤 및 테그 아무렇게 넣어도됨.)
  * SharePoint:RenderingTemplate 의 ID는 디폴트 템플릿의 사용자 이름으로 해야됨.(아래 그림 참조)

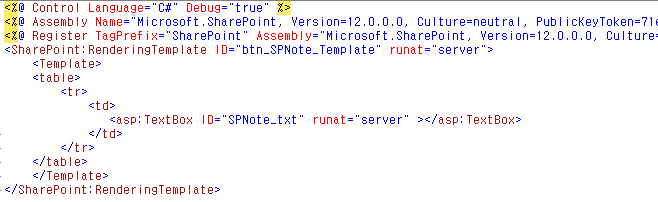
8. 컨트롤을 정의 하겠습니다 Template에 있는 텍스트 박스 하나, Display에 뿌릴 테이블 하나, 버튼 등록을 위한 버튼 하나.

9. 텍스트박스를 넣기 쉽게 하기 위해서 캡슐화 하겠습니다.

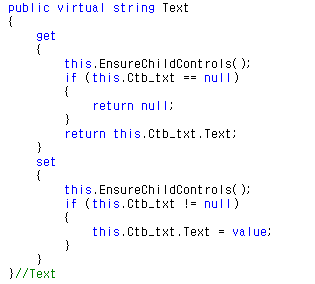
10. 값을 저장 하고 빼오기 위해서 Value를 상속 받고 Text의 값의로 설정 하도록 하겠습니다.


11. 그리고 버튼을 클릭 이벤트를 생성 하도록 하겠습니다.


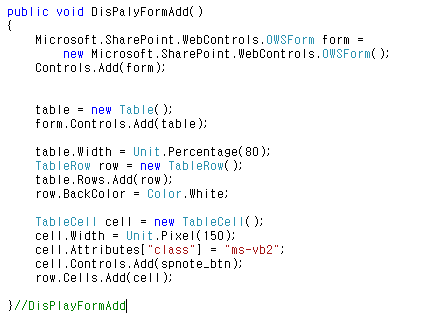
12. 이제 Display시 뿌려질 내용을 하나의 함수를 생성 해서 넣도록 하겠습니다. (Microsoft.SharePoint.WebControls.OWSForm이라는 것을 참조)

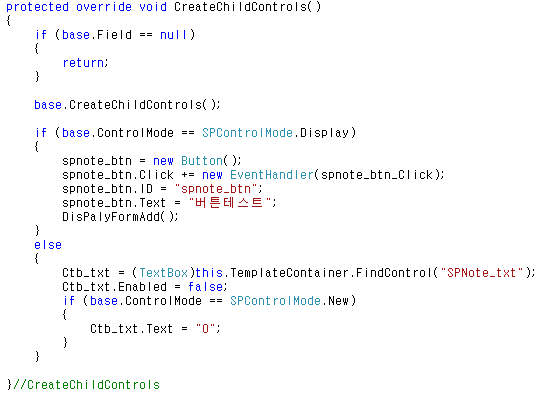
13. 해당 페이지에 뿌려줄때 동작 하는 CreateChildControls를 상속 받는다 (필드가 널인지 체크, base컨트롤 생성 및 display모드시 버튼 등록, New모드시 기본값설정)

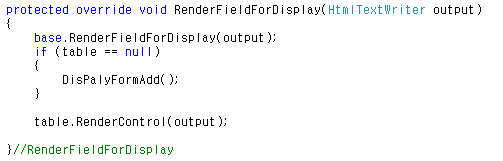
14. SharePoint에서 Display이시 컨트롤을 랜더링을 관장하는 RenderFieldForDisplay를 상속 받는다.(아까 생성한 Table을 뿌림.)


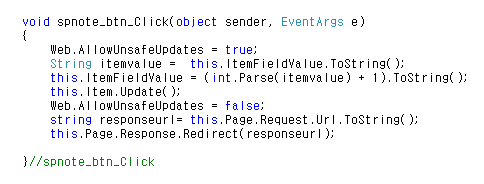
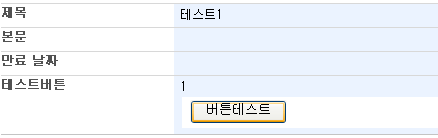
15. 이벤트에 해당 컬럼의 값을 +1 시킨다.


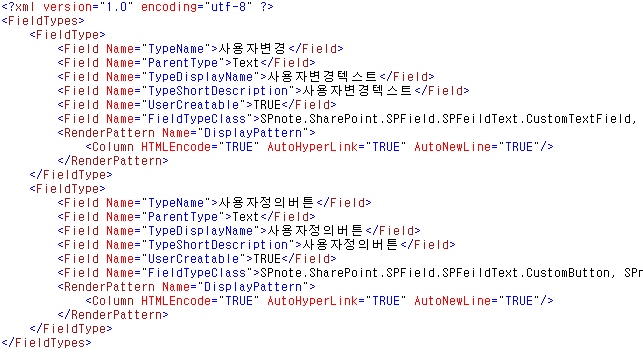
16. 필드 타입 정의 XML (저번 XML그대루 같다가 씁니다;; 편집해서 쓰세요~)

17. 해당 dll은 객에 등록, Controltemplate랑 xml은 Controltemplates랑 xml폴에 각각 복사 후 iisreset
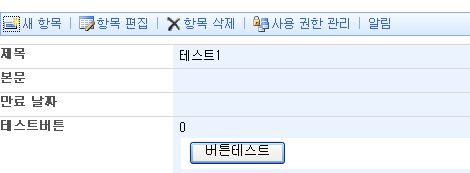
완료 화면 1)

완료 2)


완료 3)


완료 4)


완료 6)

소스 1)

[code:html;In=on] 

    public class CustomButton : Microsoft.SharePoint.SPField
    {
        public CustomButton(SPFieldCollection fields, string fieldName)
            : base(fields, fieldName)
        {
        }//

        public CustomButton(SPFieldCollection fields, string typeName, string displayName)
            : base(fields, typeName, displayName)
        {
        }//

        public override BaseFieldControl FieldRenderingControl
        {
            get
            {
                BaseFieldControl bfc = new CustomButtonBaseControl();
                bfc.FieldName = InternalName;
                return bfc;
            }
        }//FieldRenderingControl

    }//class

[/code]

소스 2)

 [code:html;In=on]

    public class CustomButtonBaseControl : BaseFieldControl
    {

        protected TextBox Ctb_txt;
        public Button spnote_btn;
        private Table table;

        protected override string DefaultTemplateName
        {
            get
            {
                return "btn_SPNote_Template";
            }
        }//DefaultTemplateName

        protected override void CreateChildControls()
        {
            if (base.Field == null)
            {
                return;
            }

            base.CreateChildControls();
           
            if (base.ControlMode == SPControlMode.Display)
            {
                spnote_btn = new Button();
                spnote_btn.Click += new EventHandler(spnote_btn_Click);
                spnote_btn.ID = "spnote_btn";
                spnote_btn.Text = "버튼테스트";
                DisPalyFormAdd();
            }
            else
            {
                Ctb_txt = (TextBox)this.TemplateContainer.FindControl("SPNote_txt");
                Ctb_txt.Enabled = false;
                if (base.ControlMode == SPControlMode.New)
                {
                    Ctb_txt.Text = "0";
                }
            }

        }//CreateChildControls

        public void DisPalyFormAdd()
        {
            Microsoft.SharePoint.WebControls.OWSForm form =
                new Microsoft.SharePoint.WebControls.OWSForm();
            Controls.Add(form);
            table = new Table();
            form.Controls.Add(table);
            table.Width = Unit.Percentage(80);
            TableRow row = new TableRow();
            table.Rows.Add(row);
            row.BackColor = Color.White;
            TableCell cell = new TableCell();
            cell.Width = Unit.Pixel(150);
            cell.Attributes["class"] = "ms-vb2";
            cell.Controls.Add(spnote_btn);
            row.Cells.Add(cell);
               
        }//DisPlayFormAdd

        protected override void RenderFieldForDisplay(HtmlTextWriter output)
        {
            base.RenderFieldForDisplay(output);
            if (table == null)
            {
                DisPalyFormAdd();
            }

            table.RenderControl(output);

        }//RenderFieldForDisplay

        void spnote_btn_Click(object sender, EventArgs e)
        {
            Web.AllowUnsafeUpdates = true;
            String itemvalue =  this.ItemFieldValue.ToString();
            this.ItemFieldValue = (int.Parse(itemvalue) + 1).ToString();
            this.Item.Update();
            Web.AllowUnsafeUpdates = false;
            string responseurl= this.Page.Request.Url.ToString();
            this.Page.Response.Redirect(responseurl);
           
        }//spnote_btn_Click

        public virtual string Text
        {
            get
            {
                this.EnsureChildControls();
                if (this.Ctb_txt == null)
                {
                    return null;
                }
                return this.Ctb_txt.Text;
            }
            set
            {
                this.EnsureChildControls();
                if (this.Ctb_txt != null)
                {
                    this.Ctb_txt.Text = value;
                }
            }
        }//Text

        public override object Value
        {
            get
            {
                return this.Text;
            }
            set
            {
                if (base.Field != null)
                {
                    this.Text = base.Field.GetFieldValueForEdit(value);
                }
            }
        }//Value

    }//class

[/code] 소스 3)

[code:html;In=on]

<?xml version="1.0" encoding="utf-8" ?>
<FieldTypes>
  <FieldType>
  <Field Name="TypeName">사용자정의버튼</Field>
  <Field Name="ParentType">Text</Field>
  <Field Name="TypeDisplayName">사용자정의버튼</Field>
  <Field Name="TypeShortDescription">사용자정의버튼</Field>
  <Field Name="UserCreatable">TRUE</Field>
  <Field Name="FieldTypeClass">SPnote.SharePoint.SPField.SPFeildText.CustomButton, SPnote.SharePoint.SPField, Version=1.0.0.0, Culture=neutral, PublicKeyToken=be2c734ef24c0327</Field>
  <RenderPattern Name="DisplayPattern">
   <Column HTMLEncode="TRUE" AutoHyperLink="TRUE" AutoNewLine="TRUE"/>
  </RenderPattern>
 </FieldType>
</FieldTypes>

[/code]

Popup Description balloon for Calendar Items

Calendar List can be used to share information about events, appointments, meetings and etc.


While I was using this list, I found that it will be better to popup its Description value when a user mouse over to each item cause it basically doesn't. Here's what the common columns of Calendar List are.

Column Name Description
Title (required) Single line of text
Location Single line of text
Start Time (required) Date and time
End Time (required) Date and time
Description Multiple lines of text


Unfortunately, Description column type is "Multiple lines of text" which means this column contains HTML tags that this have to be processed to remove HTML tags before showing its value. Here is a Display Item image and a raw value of Description column. 


  # Display Item

ex) Raw? Description Value
[code:html;ln=off]

<div>OCS R2 Verification Call for VSP</div>
<div>I support OC engineers to get it done successfully!</div>
<div>&nbsp;</div>
<div>Bold:<strong>&nbsp;Bold</strong> </div>
<div><font color="#ff9900"><font color="#000000">Font Color:</font> Orange</font></div>

[/code]


So, I need to remove HTML tags and I used Regular Expression.
ex) System.Text.RegularExpressions.Regex.Replace(Description Column Value, "<[^>]*>", string.Empty)


But where should I edit for this??? The answer is DefaultTemplates.ascx under
12 Hive\TEMPLATE\CONTROLTEMPLATES\... You can change this directly or override into new one. Calendar List has 3 ways "Day", "Week", "Month" to show Items and you need to change three Templates and they are.

  1. 2477: CalendarViewMonthItemTemplate
  2. 2539: CalendarViewDayItemTemplate
  3. 2617: CalendarViewWeekItemTemplate

    [Line Number: Template Name]


It is time to edit this template. Find A tag and put the title attribute with this codes and execute IISRESET.

[code:html;ln=off]

title="<%# System.Text.RegularExpressions.Regex.Replace(DataBinder.Eval(Container,"DataItem.Description",""), "<[^>]*>", string.Empty)%>"

[/code]


Now you can see the poping up Description value if you mouse over to any item that has Description value.


  # Demo poping up Description value

Custom Resource Provider for SharePoint Localization

 At first, I simply implemented 1. Custom Resource Provider which reads browser preference only but tricky customers wanted 2. Toggle Languages function. I used Cookie and Database for each user's localization data store and I described here how it's implemented.

* Click images below to see larger ones. 
 

1. Custom Resource Provder


2. SharePoint Localization to support a toggle function for two languages

Localization and Theme

1. SharePoint Localization and Limitation
What I have been exprienced on SharePoint Localizations are not practical for non-English users such as Variations and Team Sites. In my case, Korean customers want languages to be changed for their applications when they click buttons or by user's browser preference not like SharePoint Team Sites. As you might have noticed, replacing the asp menu to a custom one make them lose its original functions. Anyways they know this and liked it. I think adding a new layer that supports localization for asp menu is a better idea.

2. Custom Resource Provider
I have developed a custom resource provider and this supports browsers preference and toggling languages. To implement the function "Toggle Languages", I use Cookie and Database to save and retrieve user's language value.

3. SharePoint Theme
SharePoint Theme can be changed at  Home > Site Settings > Site Theme (_layouts/themeweb.aspx) but it affects all users.

4. Custom Control for user Theme enabled
Unfortunately, tricky Korean customers want individual themes such as clicking color buttons changes from current to new one and this doesn't affect other users. I created a Control to render custom css link for each user.


Here are sample images and click each image to see larger ones.
(Only menus are shown. Refer to the last image to see Page localzation)


SharePoint Page Localization
  # Localization Example ( can be toggled between English and Korean ) 


  # Individual Theme Demo


SharePoint Solutions

SharePoint Solutions

The Windows SharePoint Services solution framework provides a way to bundle all the components for extending Windows SharePoint Services in a new file that is called a solution file. A solution file has a .CAB-based format but a .WSP extension. A solution is a deployable, reusable package that can contain a set of Features, site definitions, and assemblies that apply to sites, and that you can enable or disable individually. You can use the solution file to deploy the contents of a Web Part package, including assemblies, class resources, .dwp files, and other package components. # This from msdn.

You can find out what the SharePoint solution is... and here are some resources.
  1. Solutions Overview
  2. Creating a Solution
  3. Deploying a Solution
  4. Upgrading a Solution
  5. Retracting a Solution
  6. Localizing a Solution
  7. Solution Schema


Many things to study are waiting if you want to use it but I'm going to demonstrate a simple way of installing, deploying, retracting and removing it using sample images. At first, you need to install it. I have the solution, "SPNote.SharePoint.ImprovedRTE.wsp" and the batch file which contains commands to install it and sample commands are below. This will install the solution and be appear at
"http://YourCentralAdmin/_admin/Solutions.aspx" and you can see its status as well. 
(Menu Breadcrumb: Central Administration > Operations > Solution Management)


Command of installing the solution (Download batch file)

@SET STSADM="C:\program files\common files\microsoft shared\web server extensions\12\bin\stsadm"

Echo Installing solution
%STSADM% -o addsolution -filename SPNote.SharePoint.ImprovedRTE.wsp
%STSADM% -o execadmsvcjobs

cscript C:\windows\system32\iisapp.vbs /a "SharePoint - 80" /r
REM IISRESET


If you deploy it, please execute IISRESET to refresh CONTROLTEMPLATES and the assemebly properly.

Images List
  1. Solution Management Page
  2. After installed
  3. Click Deploy Button
  4. Deployed to
  5. Deployed
  6. Demo using this solution


  # 1. Solution Management Page: currently no solutions here.


  # 2. After installed.


  # 3. Click Deploy Button


  # 4. Deployed to: Select which web application you want to deploy to


  # 5. Deployed finally: You can see its status


  # 6. Demo using this solution


Improved RichTextField

Download Improved RichTextField (Download)

Whenever I type texts into RichTextEditor Field, I thought it's small and need some functions such as extending its sizes, uploading images and etc and that drives me to write some functions and made into the solution. What I implemented are:
  1. Extend width and height
  2. Set as default sizes
  3. Save sizes
  4. Create link
  5. Insert image
  6. Localization only for Korean now


 # Solution Demo.


 # Create Link.


 # Insert Image


 # Localization (Korean)


For those who don't know how to install SharePoint solutions, I'll post an article by this week. Please let me know if you have questions for this solution.

Thanks,
Karl (cleartint@gmail.com)

SharePoint Search Visibility

My customer asked me whether it's possible to hide search results on the specific site or sites. That moved tome to the linke “Search Visibility” in Site Settings which you can set to allow this web to appear in search results or not.

What I have concerned about this is “Can I optionally set this?” even though it has been cralwed already. I mean after crawled (which is I configured “True” on this and “Start full crawl” job has done), can I just set it False and it will work as I expected? The answer is “YES!!!” (if you don’t crawl again, the answer is NO!!!). I thought it won’t happen cause when the index has crawled, it must be searched but when you crawl again after you set it False, those crawled items will be deleted by gatherer.

Q. How the Search Visibility works?
depends on how to set whether the Indexing Site Content is True or Not.

1) Search Visibility > Indexing Site Content is True
  When you do “Start Full Crawl” => it will crawl for this web.
2) Search Visibility > Indexing Site Content is False
  When you do “Start Full Crawl” => it won’t crawl for this web.
  but if there are crawled indexes, it will delete them.

I’ll show you images about each result.
1) True
  Success items: 493, Warnings: 4


2) False (crawled first after set the site to True and again after set it to False)
  Success items: 281, Warnings: 216 (497 - 281)

As you can see, the status of Crawled Content Status has changed…
and if you closely look on 2) False image, you can find out the items are deleted.
(Deleted by the gatherer…)

- Refer these pages
  1) Plan to crawl content (Office SharePoint Server)
  http://technet.microsoft.com/en-us/library/cc262926.aspx
  2) Security considerations for search (Windows SharePoint Services)
  http://technet.microsoft.com/en-us/library/cc287898.aspx

I didn’t test all menus about it that I don’t know whether it will work same.